When I was diagnosed with type 1 diabetes, all my doctors suggested that I get an insulin pump. At the time, the whole thing was new to me and just the thought of shots scared me! The thought of attaching something to me scared me much more. Especially since I had no idea how it was attached. I am not a fan of pain at all. So I told the doctors I was not interested in the pump then.
I took insulin shots for about 3 years before deciding to research the insulin pump more. I was tired of the up and down blood sugar patterns I was having, and I’d heard that the pump provided a much more even range.
I looked insulin pumps up online and found lots of information about how wonderful they are. I tried to find pictures of how you attached them to you, and I couldn’t find anything! I wanted to see pictures of how the process worked before I committed to it. How big was the needle? How did you get it in you? Did they just leave a needle in for the 2 – 3 days it was in before you changed it?
Since I couldn’t find any photos, I took it upon myself to take pictures of myself going through the process. Maybe it will help some other scared type 1’s thinking about getting the pump and wanting to see some photos! I hope so!
The first step is to gather the supplies you need. I use the minimed paradigm 722 insulin pump and they have the option of a quick-serter. It is a spring loaded gadget that you put the needle part of the infusion set into, and then just press it against your skin and push the tabs on the side and it quickly plunges the needle in. It rarely hurts. Most of the time I can’t even feel it. I know they have other options for putting the infusion set in, but this is the one I chose.
Here is a photo of the quick-serter, humalog, new reservoir, new infusion set, and iv prep.

Quick-serter, humalog, iv prep, reservoir, infusion set
Once I have everything, I load the new reservoir with humalog insulin. To do this I take it out of the plastic packaging, pull the plunger to the end of the tube, and then put the humalog vile on the blue connecter. I then push the air from the plunger into the humalog, and draw the insulin into the reservoir. Just like filling a syringe, only a big one.

Filling reservoir with humalog insulin

- Just filled reservoir
Once the reservoir is filled, I can remove the plunger. The plunger is just screwed in, so I just unscrew it.

- Just filled reservoir, plunger detached
Next I open the infusion set.
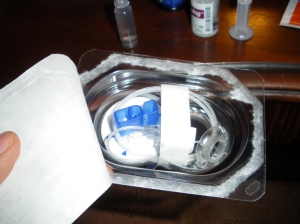
New infusion set, just opened
Take it out of the plastic, and take the paper off the cording. I am now ready to attach the infusion set to my newly filled reservoir. You’ll see on one end of the cording there is the needle surrounded by adhesive, and on the other end there is a round knob looking thing with a small needle inside. To attach the infusion set to the reservoir you take the knob end, put it onto the top of the reservoir, and turn it until it clicks. Once it clicks it is locked on.

New reservoir filled and attached to infusion set, ready to put in pump
Now that the new infusion set it ready, you can rewind your insulin pump. Before you rewind it you will want to disconnect the old infusion set from your body.
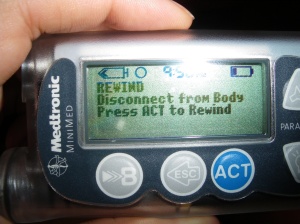
Pump notification that it's ready to rewind

Pump notification that it's rewinding
Once it’s done rewinding, it will notify you and you can take the old reservoir out. This is done by just unscrewing the reservoir from the pump.

Old/Empty infusion set and reservoir taken out of pump
Now you are ready to put the new infusion set into the pump. You just need to screw the new reservoir into the reservoir opening on your pump. Once it’s in you need to prime it by pushing a few command buttons on your pump. It will have prompts to guide you through. Priming means you fill the cord with insulin. You are done priming when you see insulin coming out the needle end of the infusion set. Once it’s primed, you can set the needle end of the infusion set into the quick-serter. Pull the needle cover off the needle, and the adhesive covers off the adhesive. Pull the end of the quick-serter back to spring load it. It is now ready to put on.
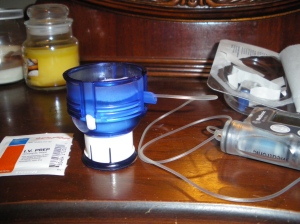
new infusion set prepped in quick-serter, ready to put on
Now you need to cover the area you are planning to put it with IV Prep. This disinfects the area and it is a little sticky, helping the adhesive stick better. Plus, I think it numbs the skin a little, but that’s just a personal opinion! You just wipe the iv prep on with the cloth it comes on, and wait for it to dry. You can feel your skin and when it’s dry your skin will feel dry but a little sticky.
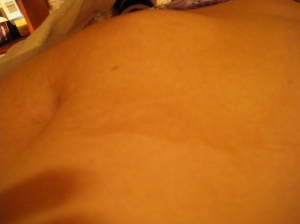
What IV prep looks like once dried on skin
Now take the quick-serter and press it to your skin where you want the new infusion set to go in.

Quick-serter loaded and ready to insert new set with the push of a button
Squeeze the buttons on the quick-serter and the spring loaded section will release and very quickly plunge the new infusion set into your skin. Remove the quick-serter. At this point the needle will still be in you.
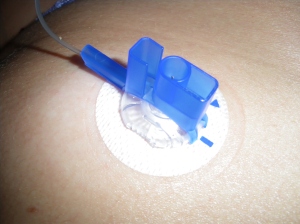
Infusion set right after inserting, before removing needle
Pull the blue cover off (which has the needle in it) and wallah, your new infusion set is in! The needle is surrounded by a very thin, very short, flexible cannula that is left under your skin which is how the insulin gets into your system.
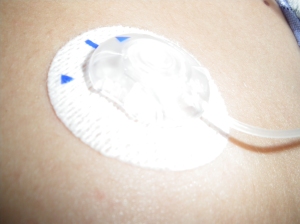
Infusion Set
Your pump will guide you through your “fixed prime” which is just giving you a little insulin to fill the cannula that is in you. Once you’ve done that, the pump will say it’s ready to work! You’re done!
Here is a picture of the needle you took out.

Infusion set needle, once removed
Of course you still need to pull the adhesive and old infusion set out. I always worried that this would hurt, but it never has.
Here is what the old one looks like. It shows the cannula that is what is actually under your skin. It’s so tiny! Especially compared to how it looks on the outside.

Old infusion set, removed
Thats all there is to it! The whole process only takes about 5 minutes. In writing it looks pretty long, but it really isn’t.
Any questions? Let me know!